
Recently Raspberry Pi 5 support was added for Home Assistant OS. The new model is twice as fast as its predecessor and add new features like a PCIe bus. The discussion started on how to use NVMe SSD’s directly connected to the PCIe bus.
M2 PCIe hats for Raspberry Pi 5
There are several PCIe hats you can buy, but there is no official Raspberry Pi hat yet, but there is an official Raspberry 5 case and Active Cooler.

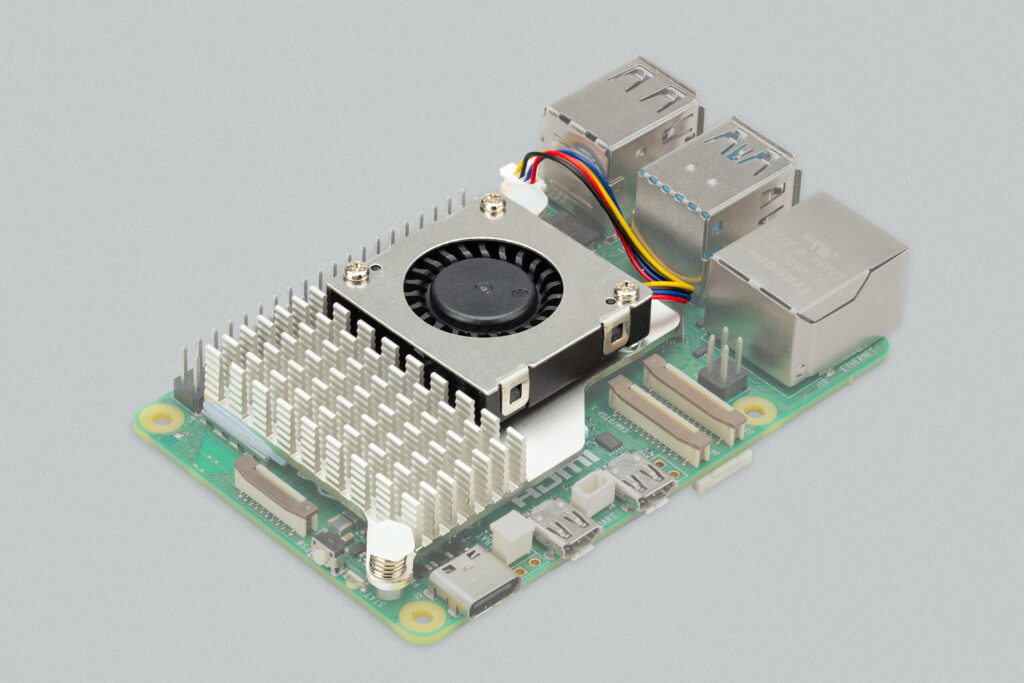
The Raspberry Pi + Active cooler fits in the case if you remove the standard fan.

An option is to attach an SSD over USB3. This works okay, but the performance is limited for NVMe PCIe SSD’s that have higher throughput than SATA SSD drives.
The Raspberry Pi 5 now brings a second alternative by allowing to connect an NVMe SSD directly to the PCIe connector.
An M2 hat exists that directly connects to the PCIe port and also fits inside the original Raspberry Pi 5 case, together with the original Raspberry Pi active cooler.
The Geekworm X1003 mounts on top of the Raspberry Pi 5 and active cooler and even allows to install the top cover (if that is desired).


Install an NVMe SSD
The Geekworm X1003 fits 2242 (42 mm) and 2230 (30mm) size NMVe SSD’s. There is a nut at the 2242 position, but you might be needing a soldering iron if you want to move the nut to the 2230 position.
At the moment most nVME SSD’s are 2280, and for that size you need a different hat, e.g. the Geekworm X1001 or X1002, but those will not fit into the original case. I found a cheap SAMSUNG 2242 SSD at Amazon. This model uses a feature named HMB (Host Memory Buffer) which requires some extra attention which I will address later. After we have mounted the SSD (make sure the PCI FFC cable is installed correctly) we can continue with the next step.
Preparing the installation
To install Home Assistant OS we use the imager that is installed by default on the Raspberry PI OS image.
So to start we need an SD-card with Raspberry PI OS flashed on it, do not flash Home Assistant OS on the SD card.
We can prepare this using the Official Raspberry PI imager. After the prepared SD card is installed in or Raspberry Pi 5 we can boot the Raspberry PI OS. When the OS is started we should be able to see if the NVMe SSD is recognized. To make sure the SSD works without issues we can use the dmesg command. If there are issues with you SSD you will see the errors in the bootlog this command shows.
Identify possible NMVe SSD issues
In my case there were a few issues I needed to address. I needed to …
- … disable PCIe power management (at least I thought that was a good idea).
- .. enable the
pcie-port on the Raspberry Pi - … enable
gen3mode - .. increase the CMA buffer to ensure enough continues memory for the Host Memory Buffer feature
If you see no NVMe SSD popping up at all, then that could be mean that…
- … your the FFC cable between board and M2 head is not connected properly.
- … your SDD is not probed correctly and you need to add
PCIE_PROBEto your EEPROM config first.
~# sudo rpi-eeprom-config --edit
# Add the following line if using a non-HAT+ adapter:
PCIE_PROBE=1
Disable PCIe power management
We can disable pcie power management. When we know that the SSD is always on, and we see errors like:
[22609.179027] nvme 0000:01:00.0: PCIe Bus Error: severity=Corrected, type=Data Link Layer, (Transmitter ID)
[22609.179031] nvme 0000:01:00.0: device [1d79:2263] error status/mask=00009100/0000e000
[22609.179035] nvme 0000:01:00.0: [ 8] Rollover
[22609.179039] nvme 0000:01:00.0: [12] Timeout
To disable pcie power management as root we need to edit /boot/firmware/cmdline.txt and add pcie_aspm=off to the command line.
Enable the PCIe port on the Raspberry Pi
Most likely this needed at all times. To enable the pcie-port as root we need to edit the config.txt containing the kernel configuration. As root you can also edit the following the file directly: /boot/firmware/config.txt
To enable pcie add the following lines:
dtparam=pciex1
dtparam=nvme
If you still have errors in you log you could also enable gen3.
Enable the PCIe gen3 mode on the Raspberry Pi
The PCIe gen3 mode is not officially supported, so only enable this if your SSD does not work correctly without it.
To enable as root we need to edit the config.txt add the following line:
dtparam=pciex1_gen=3Increase the CMA buffer
In case dmesg shows cma_allocation errors like:
[    0.514198] nvme nvme0: Shutdown timeout set to 8 seconds
[    0.516601] nvme nvme0: allocated 64 MiB host memory buffer.
[    0.519481] cma: cma_alloc: linux,cma: alloc failed, req-size: 2 pages, ret: -12
[    0.519494] cma: cma_alloc: linux,cma: alloc failed, req-size: 8 pages, ret: -12
[    0.519506] cma: cma_alloc: linux,cma: alloc failed, req-size: 2 pages, ret: -12
[    0.519513] cma: cma_alloc: linux,cma: alloc failed, req-size: 8 pages, ret: -12
[    0.519523] cma: cma_alloc: linux,cma: alloc failed, req-size: 2 pages, ret: -12
[    0.519530] cma: cma_alloc: linux,cma: alloc failed, req-size: 8 pages, ret: -12
[    0.519539] cma: cma_alloc: linux,cma: alloc failed, req-size: 2 pages, ret: -12
[    0.519546] cma: cma_alloc: linux,cma: alloc failed, req-size: 8 pages, ret: -12
[    0.519735] nvme nvme0: 4/0/0 default/read/poll queues
[    0.525784] nvme nvme0: Ignoring bogus Namespace Identifiers
[    0.531980]  nvme0n1: p1 p2 p3 p4 p5 p6 p7 p8
[    0.519735] nvme nvme0: 4/0/0 default/read/poll queues
[    0.525784] nvme nvme0: Ignoring bogus Namespace Identifiers
[    0.531980]  nvme0n1: p1 p2 p3 p4 p5 p6 p7 p8
[    0.619473] brcm-pcie 1000120000.pcie: link up, 5.0 GT/s PCIe x4 (!SSC)
[    0.619497] pci 0001:01:00.0: [1de4:0001] type 00 class 0x020000
[    0.619514] pci 0001:01:00.0: reg 0x10: [mem 0xffffc000-0xffffffff]
[    0.619524] pci 0001:01:00.0: reg 0x14: [mem 0xffc00000-0xffffffff]
[    0.619533] pci 0001:01:00.0: reg 0x18: [mem 0xffff0000-0xffffffff]
[    0.619605] pci 0001:01:00.0: supports D1
[    0.619609] pci 0001:01:00.0: PME# supported from D0 D1 D3hot D3cold
[    0.631479] pci_bus 0001:01: busn_res: [bus 01-ff] end is updated to 01
I had these errors due to the HMB (Host Memory Buffer) feature that needed more that the standard configured cma memory.
To increase the cma memory buffer I increased the default allocation of 64 MB to 96 MB.
As root we can edit the config.txt add the following line:
dtoverlay=cma,cma-96It is possible to enable a larger block, but we should not allocate more than needed. To see the free cma memory as root we can use:
# cat /proc/meminfo | grep -i cma
CmaTotal:          98304 kB
CmaFree:           15684 kB
Preparing Home Assistant OS on the NVMe SSD
When we have configured our SSD and have resolved any issues, then we can flash the NVMe with Home Assistant OS. We use the preinstalled Raspberry Pi imager that is installed by default on Raspberry Pi OS and can be found in the accessories menu. Note you can set some options that allow to set WiFi and hostname in advance. Other settings we need te set manually after the image has been flashed. Make sure the NVMe SDD is flashed correctly.
Adjusting boot order, kernel parameters and configuration
After flashing Home Assistant OS, we need to adjust the boot order and the make sure Home Assistant OS uses the same config.txt and cmdline.txt as we prepped for Raspberry PI OS. There are files in the image we need to adjust before we can boot from the new image, as for now it is not possible yet to apply these settings from the UI. To access the these files we need to mount the right partition. In my case the NVMe was called nvme0n1. If you are not sure about the name of your drive as root you can use the command fdisk -l
~# fdisk -l
...
other drive info
...
Disk /dev/nvme0n1: 238.47 GiB, 256060514304 bytes, 500118192 sectors
Disk model: SAMSUNG MZAL4256HBJD-00BL2
Units: sectors of 1 * 512 = 512 bytes
Sector size (logical/physical): 512 bytes / 512 bytes
I/O size (minimum/optimal): 512 bytes / 512 bytes
Disklabel type: gpt
Disk identifier: DFEFDCBD-D15E-4E82-B88C-5E6B46166328

Device           Start       End   Sectors   Size Type
/dev/nvme0n1p1    2048    133119    131072    64M EFI System
/dev/nvme0n1p2  133120    182271     49152    24M Linux filesystem
/dev/nvme0n1p3  182272    706559    524288   256M Linux filesystem
/dev/nvme0n1p4  706560    755711     49152    24M Linux filesystem
/dev/nvme0n1p5  755712   1279999    524288   256M Linux filesystem
/dev/nvme0n1p6 1280000   1296383     16384     8M Linux filesystem
/dev/nvme0n1p7 1296384   1492991    196608    96M Linux filesystem
/dev/nvme0n1p8 1492992 500118158 498625167 237.8G Linux filesystem
To access config.txt and cmdline.txt we mount the first partition:
~# mkdir boot
~# mount -t vfat /dev/nvme0n1p1 ~/boot
~# cd boot
~# ls
Use the same settings that were okay for Raspberry PI OS, and we should be okay.
Finally we change the boot sequence so the Raspberry Pi will boot from the SSD. The code below shows how to do that:
# Edit the EEPROM on the Raspberry Pi 5.
sudo rpi-eeprom-config --edit

# Change the BOOT_ORDER line to:
BOOT_ORDER=0xf461
# This will try SD card first, then NVMe and finally USB

# Add the following line if using a non-HAT+ adapter:
PCIE_PROBE=1

# Press Ctrl-O, then enter, to write the change to the file.
# Press Ctrl-X to exit nano (the editor).
For me it was not needed to add PCIE_PROBE. The order is read right to left. So 0xf416 will firts try 6=NVMe, then 1=sd card, then 4=USB and finally f=restart the loop. As you can see in the example, I used 0xf461 as boot order, because I prefer I can easily boot from SD card, without the need to remove the NMVe SSD, if that is needed for rescue actions.
More documentation about the boot order options can be found here: https://www.raspberrypi.com/documentation/computers/raspberry-pi.html#BOOT_ORDER.
Boot Home Assistant from NVMe SSD
When the boot order includes the NMVe as the virst valid boot option, we can try booting the flashed NMVe SSD.
The Home Assistant instance should intialize at http://homeassistant.local:8123. It may take some minutes to intialize. If you have a suitable HDMI cable and a keyboard and mouse you can get access to the Home Assistant CLI.
To see if there are errors you can excecute dmesg to see the boot log. To know if there are any PCIe run time errors you can use ha host logs -f. When useing the CLI from the console you can omit ha, so host logs -f or host logs should just work. If you set up SSH when flasing the image, you should also be able to use SSH to open the CLI.
If every thing is fine, you can start setting up Home Assistant or restore from a backup, but make sure that when you restore from a backup that the same supervisor version is used, or the backup restore will fail. To update to specific version from the CLI use:
ha supervisor update --version 2024.03.0To just update to the latest version:
ha supervisor updateRestoring from backup can take quite some time if the backup file is large. The UI does no show much detail on the progress. To see some more details you can check the supervisor logs. If anything went wrong you will able to see it.
ha supervisor logsAnd that is all: Enjoy your Home Assistant installation on Raspberry Pi 5 and NVMe SSD!